Yes — a simple jig built on your dining table can help you achieve consistently straight, evenly spaced rows in any vegetable bed. If you’ve ever squinted from the window and wished for neat planting lines, this approach will feel familiar and doable. It uses everyday wood offcuts and basic hardware so people of all skill levels can measure, predrill, and assemble indoors before heading outside.
By the end you’ll have a compact jig that adapts to one bed or many, fits raised beds and planters, and stores easily beside your table or in a mudroom. It’s practical, low-cost, and confidence-building for future projects.
Key takeaways
- The method uses simple wood and basic hardware to make precise planting guides.
- Assembling the jig on a dining table improves accuracy and reduces outdoor mess.
- Printable plans and cut lists make this approach beginner-friendly.
- The jig adapts to raised beds, in-ground rows, and patio planters.
- Skills learned—measuring, drilling, clamping—transfer to other DIY projects.
Helpful products at a glance
These are the main products recommended in this article for readers who want a quick summary before going deeper.
Best for a straighter jig edge because it gives the build a rigid measuring reference
- MEASURING TOOL: This heavy-duty straight edge by Johnson is impeccably designed for carpenters; metalworkers; builders and homeowners to use for a variety of measuring applications
- QUALITY MATERIAL: Johnson's straight edge features a sturdy and durable aluminum construction along with a clear and protective anodized finish, which protects it from everyday wear and abrasion

Best for visible row lines because braided nylon is easier to tension than loose garden twine
- SUPERIOR DURABILITY: Featuring an additional coating which makes the twine stiffer and not affected by extreme moisture, dryness or mildew. It won’t fray as easily when cut and it’s easier to knot.
- EASY TO USE: With its bright color, it's easy to see and won't get lost on the job site , allowing you to work more efficiently and get the job done faster.

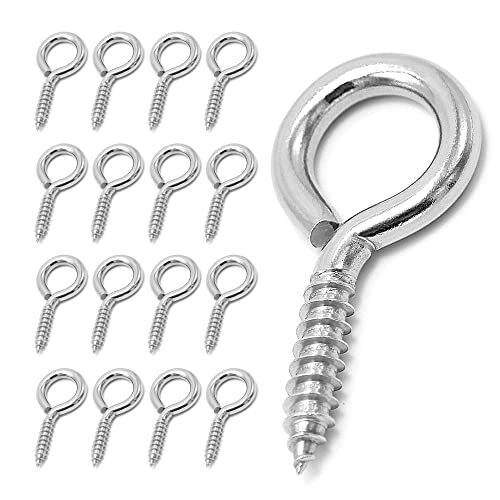
Best for string anchor points because stainless eye screws keep the line path repeatable
- 【HIGH QUALITY MATERIAL】Made of 304 stainless steel, water resistant, anti-rust, good for outdoor project.
- 【LONGER THREAD LENGTH】 Overall Length =2.55”, Thread Length =1.22”, Hole Dimension = 0.7 "; longer length makes it more secure.
Why straight rows matter for yield, design, and space
Orderly planting makes a garden perform better while looking intentional. Clean linear layout improves airflow, sun exposure, and the way a small yard reads to the eye.
Consistent spacing supports better plant health. When plants share regular gaps, leaves dry faster and disease pressure falls. Yields can improve when each plant gets similar light and air.
Parallel lines guide the eye, making beds feel deeper or taller depending on direction. Predictable lane widths use space efficiently. Paths become clear, mulch and drip lines lay cleanly, and irrigation runs without overlap. People save time weeding and harvesting when they can count steps between markers.
Tip: align the first line to a stable reference — a bed edge, fence, or patio — then mirror spacing with your jig.
Good garden layout is not about perfection. It is about giving every plant the same fair chance at light, air, and root room.
What the straight-line jig is and how it works
This jig turns careful indoor prep into accurate outdoor lines. Use simple plans and basic tools to make a compact guide you can carry to any bed.
A straight-line jig is a rigid straightedge with two stake anchors and a spool for string. Set the stakes, pull the cord taut, and the etched marks on the edge give repeatable spacing for seeds or transplants.
Think of it as a mobile ruler for the garden. Place one stake, sight the second, tighten the string, and use the marks to drop plants at even gaps. The spool keeps deployment tangle-free and fast.
Benefits: It removes guesswork, locks in spacing, and speeds planting. You’ll spend less time measuring in the yard and more time planting with confidence.
Pre-drill stake sockets, fasten the spool and add handles at your dining surface for easy carry. A short cut list, a square, and pre-marked increments cut setup time outdoors.
- Add line-of-sight markers to check drift before you set the second anchor.
- Seal wood parts or choose weather-resistant metals where contact meets soil.
- Design modular heads and swap strings for seed lines or bed edges.
Materials and tools you’ll need
Gathering the right gear speeds assembly and keeps mistakes low. A concise list makes prep simple and helps you follow the plans with confidence.
Expect to spend about $15 to $30 on materials if you already own a saw and drill. Most of the cost is the straight board and a few pieces of hardware.
Essential tools
- Drill/driver with a set of bits for pilot holes and fasteners.
- A fine-tooth saw (miter or circular) for clean cuts on wood stock.
- A reliable square and measuring tape for accurate layout.
- Two clamps to hold parts steady on the table while you work.
Hardware and accessories
Stainless eye screws are a simple way to give the string line a repeatable anchor point, but they should be sized to the wood so the jig stays clean and safe to handle.
You’ll also need:
- Stainless screws, small eyelets, and quick-release clips for string control.
- Two low-profile handles and a small cleat for the string end.
- Velcro strap to tidy excess line during transport and storage.
Plan your shopping with a mini cut list based on bed length and path width. Select straight wood stock for the body and a metal or hardwood edge for lasting straightness. Finish with exterior sealer, 120–220 grit sandpaper, and a tack cloth.
Comfort and safety matter. Add rubber feet so the base won’t slide on the dining table during assembly or on hard soil in the yard. Wear eye and hearing protection and a dust mask when cutting or sanding.
If you do not have a reliably straight board, a rigid aluminum straightedge can give the jig a cleaner reference line without turning the project into an expensive tool build.
Check this straightedge option on Amazon if you want a ready-made reference instead of relying on scrap lumber.
Choosing materials: metal, wood, and composite options
Deciding between pine, steel, or aluminum shapes the tool’s balance, weather resistance, and cost. Choice of material changes feel, durability, and how easy the guide is to move from a dining table to the garden.
Construction lumber for cost-effective rigidity
Choose straight-grained pine for a sturdy, budget-friendly body. Pine is easy to cut at home and sands smooth for clear etched marks. Seal it well with exterior finish to prevent swelling and keep measurements true after wet seasons.
Metal rails for long beds
Use steel flat bar or aluminum angle where long runs need minimal flex. Metal keeps long guides true through seasons. Reinforce high-wear spots with short metal strips so the unit stays accurate after repeated use.
Aluminum panels for weather resistance
Aluminum-based panels give a slick, unbroken edge that cleans easily after muddy sessions. They cost more but save effort when you need a low-friction, weather-ready top for many seasons.
- MEASURING TOOL: This heavy-duty straight edge by Johnson is impeccably designed for carpenters; metalworkers; builders and homeowners to use for a variety of measuring applications
- QUALITY MATERIAL: Johnson's straight edge features a sturdy and durable aluminum construction along with a clear and protective anodized finish, which protects it from everyday wear and abrasion
- PRACTICAL DESIGN: Featuring an ergonomic design; this aluminum straight edge is easy to read with black bold screened and thermal-bonded graduations in 1/8 in. and 1/6 in. The practical design also ensures maximum accuracy and delivers a precise job
- EASY STORAGE: The straight edge ruler has a hanging hole on the end; which helps you to keep it organized along with other woodworking tools and equipment
- Think in layers: a wood body with a metal or aluminum top balances weight and accuracy.
- Match base to task: wider base for long rails, slimmer base for short beds and quick setups.
- Keep weight in check: aim for a carry-friendly build you can move with gloves on.
Build steps: simple plans you can follow today
Measure first and make a short plan for every piece. Good prep on a dining surface saves time outdoors and keeps marks consistent. Work cleanly and in order: cut, dry-fit, then fasten.
Cut list and sizing the straightedge
Size to fit: measure bed length and common row spacing, then draft a cut list with overall straightedge length, base thickness, and stake positions. Keep two plans handy—one for long beds and one for small planters.
For a standard 6-foot raised bed, cut one 1×4 pine board to 72 inches for the straightedge. Cut a 12-inch 1×3 for the crosspiece that holds the stakes. Use two 12-inch lengths of 1×1 hardwood dowel or metal rod for anchors. If you work with patio planters, scale down to a 36-inch straightedge and 6-inch anchors.
Assembling the base, legs, and string line anchor points
Cut clean, make square cuts, and label each piece. On the dining table, dry-fit parts to confirm alignment before driving screws.
Assemble the base by attaching the edge strip, installing a spool, and fitting two removable legs or stakes for flexible anchoring. Use stainless eyelets at both ends and tie on braided nylon string for low-stretch tension.
- 【HIGH QUALITY MATERIAL】Made of 304 stainless steel, water resistant, anti-rust, good for outdoor project.
- 【LONGER THREAD LENGTH】 Overall Length =2.55”, Thread Length =1.22”, Hole Dimension = 0.7 "; longer length makes it more secure.
- 【EASY TO INSTALL】Metal points can bite into wood, plywood or drywall swiftly without stripping; provide maximum strength and durability.
- 【WIDELY USED】Generally used to attach cables, chains and ropes in concrete and wood surfaces. Perfect for hanging office objects, gym accessories, pot plants,hanging tools,kitchen tools,lamps, even for marine, bath and outdoor applications and so on. Also suitable for securely hanging light weight items such as lights, picture, arts, rope cords and more.
Check this stainless hardware option on Amazon if you need eye screws that will hold up in damp garden storage.
Drill pilot holes before installing hardware to reduce splitting, especially if your straightedge is thin. Space eye screws about 6 inches from each end and add one in the center if you plan to run multiple string lines.
Adding etched reference marks for spacing
Add reference marks by scribing etched lines at standard plant gaps. A subtle mark every 12 inches helps you count intervals quickly and keeps visual clutter low.
Finishing, sanding, and sealing
Sand edges smooth to avoid splinters and apply two to three coats of exterior sealer. Calibrate etched intervals against a steel ruler before sealing so final marks are accurate.
Important: If using pressure-treated wood for any part that contacts soil near edible plants, consider using a food-safe barrier or untreated hardwood instead. Some gardeners prefer cedar or redwood for natural rot resistance.
- Test tension: clamp the jig across a table, pull the string, and confirm the line centers over etched marks along the full length.
- Pack a small pouch with spare string, marker, and a mini square for easy field tweaks.
- Run one row on a calm day to confirm spacing before scaling up.
Garden use: laying out lines, spacing, and bed widths
Begin each bed by laying a reference line along an unbroken edge; it makes following marks later feel effortless. Good sightlines and consistent spacing help plants breathe, grow, and make harvesting simpler.
String-tight technique for straight lines
Place the first stake square to a bed edge, pull the string taut, and lock tension before you set the far stake. Verify alignment by sighting down the string with the jig’s line-of-sight markers.
A bright braided mason line is one of the few supplies worth choosing carefully because a weak or hard-to-see string makes the whole jig less useful in the garden.
See this mason line option on Amazon if you need a bright, low-stretch line that is easier to see than standard twine.
For L-shaped or U-shaped beds, reset the string for each run instead of bending it around corners. Lift the string slightly while you plant so soil won’t drag seeds out of place.
Using etched markers to standardize row spacing
Drop seeds or transplants at each etched mark so spacing stays consistent. Adjust spacing by crop size—leafy greens closer, tomatoes wider—and keep the pattern the same across beds for predictable results.
| Crop | Typical spacing (in) | Why it matters |
|---|---|---|
| Leafy greens | 6–8 | Close spacing for quick harvest |
| Root veg | 12–18 | Room for roots and cultivation |
| Tomatoes/peppers | 18–36 | Airflow and staking room |
- Maintain the edge: wipe the wood finish after use so buildup doesn’t skew future layout.
- Work in good light: early morning or late afternoon reduces glare and helps you read marks.
- Final check: step back and use linear perspective to make sure lines appear uniform across the bed.
Small spaces and large plots: sizing the project
Scale your guide to match the bed you have and the way you live with it. Design choices—length, weight, and storage—determine if the tool fits a compact apartment yard or a broad backyard.
Start by measuring the longest run you’ll mark and the tightest place you’ll store the tool. A 6–8 foot guide suits most raised beds. For wide fields, build a two-piece rail that joins securely for long runs.
Keep weight under 8–12 pounds so one person can carry it between beds. Choose stake length to match soil: short for firm ground, longer for sandy fills to keep string tension true.
Think about where you prep and store the unit. If your dining room or mudroom is compact, design a slim profile that hangs flat or slides behind cabinets.
- Modular: make interchangeable heads for salads, roots, and fruiting crops.
- Upgrade later: add extensions or a second rail as your garden grows.
Common mistakes and pro tips for straighter rows
Good setup and simple habits prevent small errors from growing into crooked lines. Use true stock, steady tension, and repeatable checks so each pass in the garden matches your plan.
A warped rail or slack line will show up quickly in the bed. Inspect every board edge before building. Even a slight bow becomes a visible curve over distance.
Avoiding warped materials and slack lines
Use low-stretch braided line and a simple tensioner; retighten after temperature shifts. Confirm anchor stakes sit at right angles to bed edges so tiny errors don’t magnify. Don’t tension over loose mulch—set anchors into firm soil for reliable alignment.
| Common problem | Cause | Quick fix |
|---|---|---|
| Wavy lines | Warped rail or bowed board | Replace rail or add a metal edge |
| Slack string | Low-quality cord or temp changes | Use braided line and a tensioner; retighten |
| Drift at far end | Anchors not square | Reposition stakes with a square; re-sight |
| Inconsistent marks | Soil buildup or wear | Wipe edges; re-etch or repaint marks |
- SUPERIOR DURABILITY: Featuring an additional coating which makes the twine stiffer and not affected by extreme moisture, dryness or mildew. It won’t fray as easily when cut and it’s easier to knot.
- EASY TO USE: With its bright color, it's easy to see and won't get lost on the job site , allowing you to work more efficiently and get the job done faster.
- VERSATILE APPLICATIONS: For staking out sites before concreting, landscaping or laying bricks and blocks. Its high visibility makes it ideal for situations where a clear and straight line is essential.
- ENHANCED STABILITY AND PRECISION: Our #18 Bonded Braided Nylon Mason Line features a tightly braided construction that prevents sagging and unraveling. This provides enhanced stability and precision when laying bricks or blocks, allowing you to achieve straight lines effortlessly and complete your projects faster and more efficiently.
- Store smart: hang the guide flat to prevent twist and keep heavy items from bending the rail.
- Clean after use: wipe soil off edges so buildup won’t change how the string rides the guide.
- Practice placement: dry-run a few placements on your dining surface so steps are automatic outside.
- Two verification ways: sight along the string and cross-check with a long straightedge on the soil to catch subtle drift.
- Upgrade smartly: if seasonal movement appears, fit a metal edge or add a second anchor for extra stability.
Frequently asked questions
How long does this jig take to build?
Most people finish in one to two hours, plus drying time if you apply exterior sealer. Cutting and assembly move quickly once you have a straight board and the right drill bits.
Can I use scrap wood I already have?
Yes, as long as the piece is straight, dry, and not pressure-treated if it will contact soil near edible plants. Avoid warped or cracked boards because the error will transfer straight to your rows.
Do I need a table saw?
No. A hand saw, circular saw, or miter saw all work. The cuts are simple and straight. Clamping the board to your table before cutting improves safety and accuracy.
Will this work for raised beds?
Yes. Scale the straightedge length to your bed interior and use stakes that match your soil depth. A 6-foot jig fits most standard raised beds.
Can I skip the string and just use the board as a ruler?
You can, but the string gives a sight line that is easier to follow across long beds. For short patio planters, the straightedge alone may be enough.
What if I only have room for a 4-foot jig?
Build a shorter one and mark in sections. Move the jig down the bed in overlapping increments. It takes slightly more time but still beats freehand guessing.
Conclusion
A straight-row jig is one of the simplest indoor projects that pays off all season. With about two hours, twenty dollars in lumber and hardware, and a dining table as your workbench, you can build a tool that removes the guesswork from vegetable bed layout.
Start with a 6-foot 1×4, add two stakes, a length of braided line, and a few eye screws. Test it on one row before you scale up, and adjust your etched marks to match the crops you actually grow. Straight lines won’t guarantee a perfect harvest, but they give every plant the same chance at light, air, and root room. That is a worthwhile trade for an afternoon of work.